Meditation2023. 6. 8.
- 명상의 핵심은 퉁쳐서 말해 현재(구체적으로는 호흡)에 집중하고 떠오르는 생각을 인지한 채로 engage하지 않는 것.
- 의학적으로 유의미한 명상의 실행 유무에 따른 차이가 나타나는 데는 대략 8주 정도가 걸린다고 함.
- 그리고 세션당 20분 이상(정확히는 17분 +) 지속시 확실한 의학적 효과가 관찰된다고 함.
- HPA Axis(시상하부-뇌하수체-부신 축)가 명상으로 인해 'shutdown' 되는데 그 정도의 시간이 걸리기 때문.
- 의학적 효과는 HPA Axis 활성화도/코티졸 농도 정상화?라고 퉁쳐서 말할 수 있음.
- 코티졸 농도가 높으면 백혈구 양이 증가하고 그로 인해 자가면역질환이 발생하는데, 거기에 명상이 직접적으로 도움을 줄 수 있음.
- 명상을 하다가 조는 것은 매우 일반적인 현상.
- 명상을 하다가 자꾸 딴 생각을 하는 것도 매우 자연스러운 현상.
- 명상 state를 '유지'하는 것보다 다시 명상 state로 돌아오는 행동이 '반복'되는 것이 더 중요할 수 있음.
`URL` object2023. 6. 5.
const url = new URL('https://sehyunchung.dev')

url.toString() // 'https://sehyunchung.dev/' <- trailing slash 생기는 것에 유의

url.pathname = 'post/1'

url.toString() // 'https://sehyunchung.dev/post/1' <- trailing slash 없음

url.searchParams.set('key', 'value')

url.toString() // 'https://sehyunchung.dev/post/1?key=value'
const url = new URL('https://sehyunchung.dev')
url.toString() // 'https://sehyunchung.dev/' <- trailing slash 생기는 것에 유의
url.pathname = 'post/1'
url.toString() // 'https://sehyunchung.dev/post/1' <- trailing slash 없음
url.searchParams.set('key', 'value')
url.toString() // 'https://sehyunchung.dev/post/1?key=value'// console.log(url)
{
hash: ""
host: "sehyunchung.dev"
hostname: "sehyunchung.dev"
href: "https://sehyunchung.dev/post/1?key=value"
origin: "https://sehyunchung.dev"
password: ""
pathname: "/post/1"
port: ""
protocol: "https:"
search: "?key=value"
searchParams: URLSearchParams {size: 1}
username: ""
}// console.log(url)
{
hash: ""
host: "sehyunchung.dev"
hostname: "sehyunchung.dev"
href: "https://sehyunchung.dev/post/1?key=value"
origin: "https://sehyunchung.dev"
password: ""
pathname: "/post/1"
port: ""
protocol: "https:"
search: "?key=value"
searchParams: URLSearchParams {size: 1}
username: ""
}url.pathname = ''
url.toString() // "https://sehyunchung.dev/"
url.pathname = 1
url.toString() // "https://sehyunchung.dev/1"
url.pathname = null
url.toString() // "https://sehyunchung.dev/null" ?!
url.pathname = undefined
url.toString() // "https://sehyunchung.dev/undefined" ?!url.pathname = ''
url.toString() // "https://sehyunchung.dev/"
url.pathname = 1
url.toString() // "https://sehyunchung.dev/1"
url.pathname = null
url.toString() // "https://sehyunchung.dev/null" ?!
url.pathname = undefined
url.toString() // "https://sehyunchung.dev/undefined" ?!🫠 Hydration Mismatch 🫠 (2)2023. 6. 3.
요기서 이것 저것 해봤는데 다 별로인 것 같다. 왜냐면 다 hydration mismatch를 해결하는 게 아니고 피해가는 것이기 때문인듯...
그러니까 애시당초 'mismatch'가 발생하는 건
- client state가 client에서만 액세스 가능한 곳에 persist 되어있어서
- server에서 액세스가 안되니까
- UI 상태가 달라질 수 밖에 없다.
인데 그렇다면
- client state persist를
- server에서 액세스 가능한 곳에 하면 되는 것잉게롱.
그래서 좀 손이 가지만 걍 이렇게 해봤는데,
- persist엔
cookie를 사용한다. - 왜냐면 쿠키는 서버 컴포넌트에서 읽기 가능이므로. 암튼 그래서 플로우는,
- 서버 컴포넌트에서
cookie를 읽어서 고 안에 들어있는 persisted state를 가져온다. - mismatch가 발생하는 클라이언트 컴포넌트에 위 state를 넘겨줄 prop을 하나 뚫는다.
- 그리고 같은 클라이언트 컴포넌트에
useState로 local state를 하나 만드는데, - 만들면서 initialState로 위 서버 컴포넌트에서 받아온 prop을 넘겨준다.
useEffect를 하나 추가해서- 클라이언트 컴포넌트가 쓰고 있는 persisted store을 local state에 묶어준다.
- 깅까 대략
export function useSyncedState<T>(clientState: T, serverState?: T) {
  const [state, setState] = React.useState<T>(serverState ?? clientState)

  React.useEffect(() => {
    setState(clientState)
  }, [clientState])

  return state
}
export function useSyncedState<T>(clientState: T, serverState?: T) { const [state, setState] = React.useState<T>(serverState ?? clientState) React.useEffect(() => { setState(clientState) }, [clientState]) return state } - 왈료
이러면
- 어차피 서버도 클라이언트도 같은 걸 보고 있으므로 애시당초 mismatch가 아님.
- hydration이 되기 전에 이미 같은 상태의 UI가 보이므로 깜빡임 같은 게 없음.
근데:
- 서버 호출을 해야 됨
- 그래서 요렇게 한 컴포넌트가 들어있는 페이지는 static export가 안됨
github issue는 discussion이 될 수도 있고 다른 repo로 갈 수도 있는 엄청난 존재이다2023. 6. 3.
-
심지어 다른 repo로 갔다가 다시 돌아올수도 있다
-
근데 discussion이 되어버리면 다시 issue로 돌아올 수는 없다
- 하지만 discussion이 되어버린 자신을 복제해 새 issue를 만들 순 있다
-
cms를 issues에서 discussions로 옮기는 것은 어떨까 하여 알아보다 알게 됨.
🫠 Hydration Mismatch 🫠 (1)2023. 6. 2.
이런 저런 이유로 클라이언트 상태를 localStorage 등에 persist 하고 있을 경우 server/client mismatch가 발생할 수 밖에 없는데 그래서 서버에서 프리렌더가 안되게 하려면 아래와 같은 난리 법석이 필요.
useState+useEffectfunction Comp() { const storeState = useStoreState() ^^^^^^^^^^ 1) 요걸 그냥 쓰면 💣 인 경우, const [state, setState] = React.useState() React.useEffect(()=>{ setState(storeState) },[]) // 2) 이런 난리 법석 후에 return <div>{state}</div> // 3) 이러면 통과function Comp() { const storeState = useStoreState() ^^^^^^^^^^ 1) 요걸 그냥 쓰면 💣 인 경우, const [state, setState] = React.useState() React.useEffect(()=>{ setState(storeState) },[]) // 2) 이런 난리 법석 후에 return <div>{state}</div> // 3) 이러면 통과useMounted+return null// 0) 일단 이런 난리 법석을 만들어두고 const useMounted = () => { const [m, sM] = React.useState(false) // ^^^^^ 귀찮아서 대충 씀 React.useEffect(()=>{ sM(true) }, []) return m }// 0) 일단 이런 난리 법석을 만들어두고 const useMounted = () => { const [m, sM] = React.useState(false) // ^^^^^ 귀찮아서 대충 씀 React.useEffect(()=>{ sM(true) }, []) return m }function Comp() { const storeState = useStoreState() ^^^^^^^^^^ 1) 요걸 그냥 쓰면 💣 인 경우, const mounted = useMounted() if (!mounted) return null // 2) 이러고 나서 return <div>{storeState}</div> // 3) 이러면 통과function Comp() { const storeState = useStoreState() ^^^^^^^^^^ 1) 요걸 그냥 쓰면 💣 인 경우, const mounted = useMounted() if (!mounted) return null // 2) 이러고 나서 return <div>{storeState}</div> // 3) 이러면 통과next/dynamic+{ ssr: false }☜ 이게 기분이 제일 덜 나쁜듯하지만 캐치가 하나 있는데,const Comp = dynamic(() => import('path/to/comp'), { ssr: false }); // 젤 간단?const Comp = dynamic(() => import('path/to/comp'), { ssr: false }); // 젤 간단?Comp는 무조건export default여야 함.대신const Comp = dynamic(() => import('path/to/comp').then(mod => mod.Comp), { ssr: false }) // ^^^^^^^^^^^^^^^ 이러면 💣const Comp = dynamic(() => import('path/to/comp').then(mod => mod.Comp), { ssr: false }) // ^^^^^^^^^^^^^^^ 이러면 💣loading으로 서스펜스 간지를 낼 수 있음(...)물론 next 한정이지만요...const Comp = dynamic(() => import('path/to/comp'), { ssr: false, loading: () => <Sekeleton /> }); // 이 가능const Comp = dynamic(() => import('path/to/comp'), { ssr: false, loading: () => <Sekeleton /> }); // 이 가능
이거 다 별루고... 로 시작하는 글을 한참 쓰고 있었는데 브라우저 꺼져서 날아감...
`blurDataUrl` 만들기2023. 6. 2.
갯츠비는 알아서 해주지만 넥스트는 해줘야 되기 때문에...
import { decode, encode } from "blurhash"
import sharp from "sharp"

const loadImageData = async (src: string) => {
  const response = await fetch(src)
  if (!response.ok)
    throw new Error(
      `Failed to load image: ${response.status} ${response.statusText}`
    )

  const imageBuffer = await response.arrayBuffer()

  const { data, info } = await sharp(imageBuffer)
    .ensureAlpha()
    .raw()
    .toBuffer({ resolveWithObject: true })

  return {
    data: new Uint8ClampedArray(data),
    width: info.width,
    height: info.height,
  }
}

export const encodeImageToBlurhash = async (imageUrl: string) => {
  const { data, width, height } = await loadImageData(imageUrl)
  return encode(data, width, height, 4, 4)
}

export const blurhashToBase64 = async (
  blurhash: string,
  width: number,
  height: number
) => {
  const pixels = decode(blurhash, width, height)
  const webp = sharp(Buffer.from(pixels), {
    raw: { width, height, channels: 4 },
  }).webp()
  const dataString = (await webp.toBuffer()).toString("base64")

  return `data:image/png;base64,${dataString}`
}

export const generateBlurDataUrl = async (
  imageUrl: string
): Promise<string | undefined> => {
  try {
    const blurhash = await encodeImageToBlurhash(imageUrl)
    return await blurhashToBase64(blurhash, 4, 4)
  } catch (error) {
    console.error(error)
    return undefined
  }
}
여러가지 더 있다.
`aria-current`2023. 6. 1.
현재 페이지/단계/위치/시간/등등을 나타낼 수 있는 어트리뷰트이고 대략 이런 느낌이다.
<ul>
<!-- ... -->
  <li aria-current="page">
    <a href="">link</a>
  </li>
<!-- ... -->
</ul><ul>
<!-- ... -->
<li aria-current="page">
<a href="">link</a>
</li>
<!-- ... -->
</ul>다양한 걸 다룰 수 있음:
page: Represents the current page within a set of pages such as the link to the current document in a breadcrumb.step: Represents the current step within a process such as the current step in an enumerated multi step checkout flow .location: Represents the current location within an environment or context such as the image that is visually highlighted as the current component of a flow chart.date: Represents the current date within a collection of dates such as the current date within a calendar.time: Represents the current time within a set of times such as the current time within a timetable.true: Represents the current item within a set.false(default): Does not represent the current item within a set.
MDX에 무심코 <3을 쓰면 터진다2023. 5. 29.
<3은 emoji가 없던 시절 하트를 표시하던 방법이다. 좀 전에 graphite cheatsheet til을 쓰면서 무심코 하트를 <3으로 했었는데 로컬 빌드가 터져서 음? 하고 보니 당연한 얘기였다.
MDX에게 <란 jsx의 시작이기 때문에...
추가:
<>도 터짐<-도 터짐
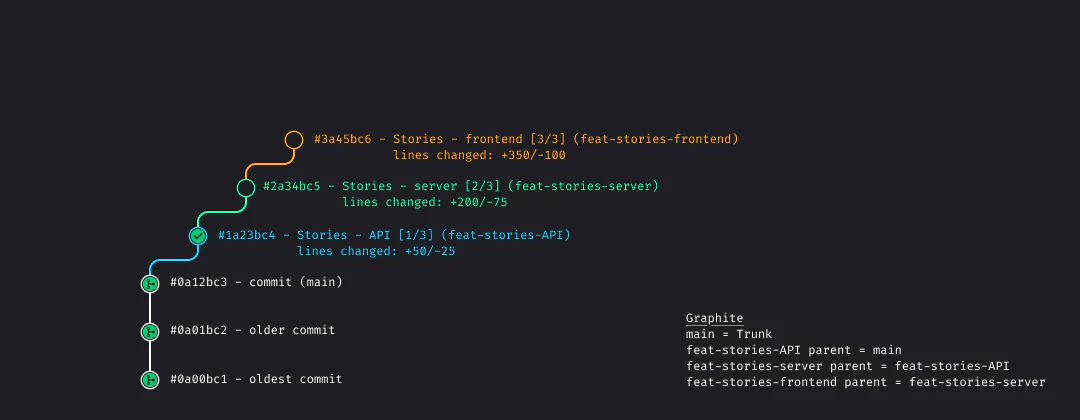
Graphite cheatsheet2023. 5. 29.
https://graphite.dev/docs/graphite-cheatsheet
어제부터 본격적으루다가 써보는 중. cli 베이스인 것도 맘에 들고 플로우도 맘에 들고 이래저래 편하고 좋당🖤
커밋하기
gt bc -am '<message>'gt bc -am '<message>'브랜치를 만들지 않고 변경+커밋하면서 브랜치까지 만드는 플로우. 브랜치 이름도 알아서 만들어줌.
생성되는 브랜치명의 기본 템플릿은 아래와 같음.
mm-dd-commit_messagemm-dd-commit_message변경 추가
gt add -A && gt cagt add -A && gt ca기본적으로 git commit --amend와 같음. 그냥 커밋 추가도 가능하긴 한데(gt cc) 브랜치당 하나의 커밋이 스타일이므로 (변경의 영역/성격 등이 다른데 관련이 있다면 일단 PR을 보내고 거기다 다시 PR을 보내라는 스타일) 이렇게 하라고 되어있음.
PR 보내기
gt ssgt ssMerge
graphite 웹앱에서 할 수도 있고 걍 깃헙에서 해도 되고.
마무리
gt rs -rgt rs -r로 싱크를 맞춤. main은 pull 해주고 머지된 작업 브랜치를 자동으로 지워줌. 꼬리 물기 PR 싱크도 요 단계에서 처리.
TailwindCSS: You can not pass arbitrary values as variables2023. 5. 28.
const A = `after:content-['░']`

const B = `after:content-['${variable}']`
const A = `after:content-['░']`
const B = `after:content-['${variable}']`A works, but B doesn't.